When I started the original planning of my OBA set up I was just going to run a 12 volt portable into an
8 gallon tank behind the rear seat.
I ran this as a temporary set up when I went on the Freedom Trailriders Powder Puff / Wheeling for a cure run in June of 06 . The set up worked quite poorly, It took just over 10 minutes to inflate a set of 30” Goodyear’s back up from
15 PSI. By he time I finished the last tire there was barely enough pressure to run the pneumatic ratchet to reconnect my
sway bar links (no disconnects). That’s when I started to look into other options.
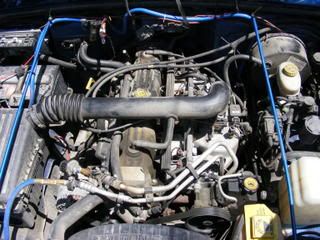
The TJ’s engine compartment is a bit tight with all the smog & cruse control so the York was out. One day while
browsing other Jeep and other 4x4 sites I stumbled upon Brian Simon
’s Jeep site with a link to his OBA With your stock A/C Compressor mod article. He is very right in saying that there are two huge bonuses to using the factory air conditioner compressor for
building your on board air system. The pump/compressor is already installed with the proper brackets and belts for your motor,
and the wiring you need is already in place.
This was a helpful site but for my TJ I needed more.
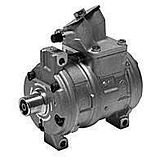
The TJ came from the factory with the Denso 10PA17 seven cylinder reciprocating wobble plate-type compressor (they kind
that gets lubricated by the goop in the R-134a refrigerant).
Fortunately I had the service manual for model years 98 - 03 on CD so I printed out plumbing and wiring
sections I need to plan and execute the new set up.
Note:
The wire colors in the diagram may not match your vehicle exactly, be sure to
take note for future reference.
Since I got her back from the shop after my accident on Super Bowl Sunday of 06 Not everything was in proper working order, the compressor needed to be tested .
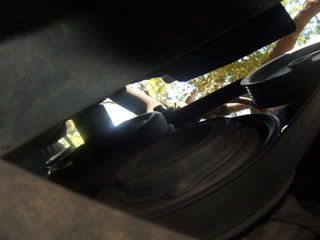
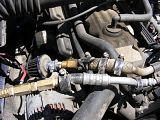
On the Inline 6 cylinder the compressor is mounted below the power steering pump witch makes it difficult to access the
suction and discharge ports that are located on the cylinder head.


The compressor also has a high pressure relief valve located on the manifold, this valve is designed to vent
the system when a discharge pressure of 500 - 600 PSI is reached to protect against damage to the compressor caused by air
flow restrictions or in my case over lubricating the system.
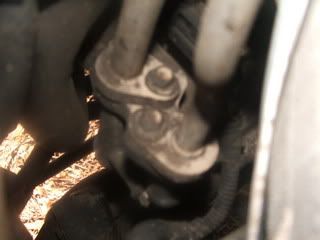
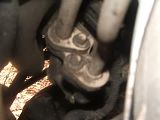
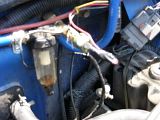
Once having the refrigerant recovered I cut the metal hose on the suction line just after the rubber/metal
splice, and the rubber hose in the discharge line about 3 inches from the metal section (I wish I had cut them longer for
future use).
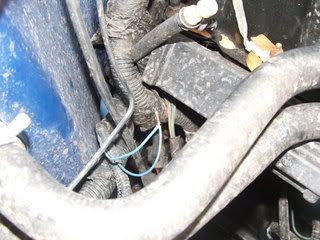
I than sniped the wires to the Low pressure cycling clutch switch located in the accumulator (later
removed to create space) 
and spliced them together, followed by the high pressure cut off switch located in the
discharge line just above the compressor 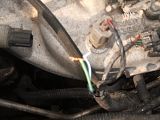 and kept those open while I started the jeep and turned on the A/C, I connected the wires with a test
lead (just to have a bit more control) and it worked.
and kept those open while I started the jeep and turned on the A/C, I connected the wires with a test
lead (just to have a bit more control) and it worked.
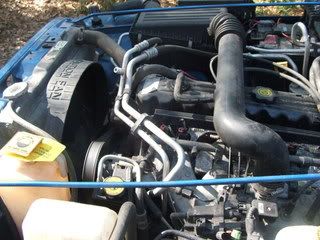
After testing was done I ran hose with an outer diameter of ¾ of an inch.
Starting from the discharge hose I connected a 1/4 In. NPT Male Hose End to the remainder of the factory hose into a 1/4 In. x 1/4 In. NPTF Connector.
I connected a
¼ in x ¼ in MNPT check valve followed by another 1
/4 In. x 1/4 In. NPTF Connector , and started the hose from there.

I used the factory a/c line brackets to run the hose around the air box & under the relay box than
wire tied it to the support that runs from the fire wall to the grill to bring it to the fire wall & attached it and a
1/4 In NPT Air Compressor Filter to the fire wall. A 1/4 In. Npt Brass Tee was attached to the filters exit to house my pressure switch
and a ¼ in right angle npt fitting to continue the hose along the fire wall and down to the frame to a Class A fire
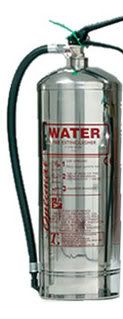
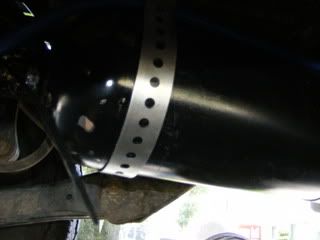
extinguisher that I converted into an air tank with a max pressure rating of 300 psi.
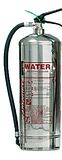
To modify the extinguisher I removed the top and removed the spring an trigger button, than the handle
pieces. I drilled the top and straight through where the hose is and tapped them to fit the ¼ in mnpt fittings. I put the
blow off valve on the back side & a 1/4 In. Npt Brass Tee where the hose use to be to attach a ¼ in right angle npt fitting for the air
to flow into the tank along with a 1/4 In Drain Cock. I used the hole on the top for the exit port. The tank was than mounted under the jeep on the drivers side near the transfer
case,
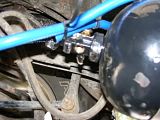
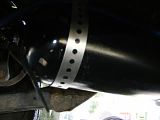
and a hose ran to the rear and mounted to the cross member with a 1/4 In. NPT Male Hose End and a universal
Quick Connect
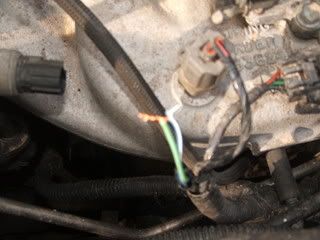
The compressors factory high pressure cut off switch wires
where spiced together and the wires for the Low pressure cycling clutch switch where connected to the pressure switch &
a toggle switch that I placed in the cab.
I have not worked out all the wireing details so for now i have to turn on the heat/ A/C inorder for the compresor
to work, But it does & quite well.